


How To Rebuild The Velocity RDA
How To Rebuild The Velocity RDA


Learning how to rebuild the Velocity RDA is one of the simplest tasks in the vaping world. It was recently voted as the Best RDA on Guide To Vaping’s Best of 2015 event, as vapers from around the globe unanimously showed their love for this product. Whether you are a beginner, looking at building your first ever RDA, or an advanced user, kick back, relax and lets look at some information on optimizing your Velocity use.
What Makes The Velocity Different.
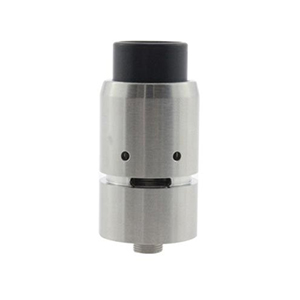 It seems that many people are in love with the Velocity for a very simple reason. The 2 post, 4 hole design make’s it very easy to work with. Rather than trying jam both coils into a single hole on a center post, or even off-center holes in a 4 post system, this deck is makes coil building a breeze.
You do not have to pre bend your coil legs in exact locations to get them centered for the airflow, the way it is designed, the coils are centered anyway. Add that to the awesome airflow system design and the fact that the RDA looks like a character or 2 from South Park, the Velocity has won the hearts and minds of many.
Before We Get Started
As I always state with any build, know the limits of your equipment. Most vaping related accidents occur because of user error. Take the time to learn the Amp limits of your batteries, especially if you are using a single cell mechanical mod. If you don’t want to end up in the local hospital use a coil calculator – steam-engine.org is my personal favorite – and ALWAYS check your build on an Ohm Reader before you attempt to fire it. It isn’t just about knowing if you have got the coils right. Using an Ohm reader may see something that you didn’t, such as a small piece of wire that has dropped on to your deck causing a short. If you had hit that without checking, the possibility of venting is very real.
Lets Get To Building
What You Will Need
 Coil Jig / Screw Driver with the correct diameter for the coils you will be building – I will be using the Coil Master Coil Jig V3 3.5 mm.
Wire – I will be using 22 Gauge Kanthal A1.
Wicking Material – I will be using Japanese organic cotton sheets, 2 x 2 inches.
Wire Cutters.
Ohm Reader – I will be using an IPV3 Li as the Ohm reader is the most accurate I have found.
Tweezers – If you are using metal ended tweezers, do not attempt to pulse the coils while holding them, as this will cause a short.
Scissors – To trim and shape the wicks.
Allen Wrench – This should be in the box that the velocity came in.
Vaper Towels – paper towels, you should always have them lying around.
Coil Jig / Screw Driver with the correct diameter for the coils you will be building – I will be using the Coil Master Coil Jig V3 3.5 mm.
Wire – I will be using 22 Gauge Kanthal A1.
Wicking Material – I will be using Japanese organic cotton sheets, 2 x 2 inches.
Wire Cutters.
Ohm Reader – I will be using an IPV3 Li as the Ohm reader is the most accurate I have found.
Tweezers – If you are using metal ended tweezers, do not attempt to pulse the coils while holding them, as this will cause a short.
Scissors – To trim and shape the wicks.
Allen Wrench – This should be in the box that the velocity came in.
Vaper Towels – paper towels, you should always have them lying around.Step 1.
Undo 4 screws on the sides of the deck posts using the Allen Wrench, making sure that the base of the screws are clear of the post holes. Do not pull them all the way out as they can be a pain to put back in. If you already have a build on the deck, use pliers or tweezers to pull the old coils out. run the deck under water to clean it, then dry it with your vaper towels.


Step 2.
Using the Coil Master Coil Jig V3, I wrapped my coils using the 3.5 mm head. After consulting with Steam-Engine.org I knew that to get to my desired output I would need to wrap 6/7 for each coil. Insert the wire into the base unit hole and twist, it is really that simple. If you are using a screw driver the concept is exactly the same, I just find it easier to work with the Jig.


Step 3.
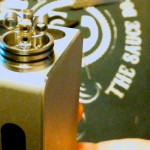
After you have created 2 equal coils, we can begin the installation process. Insert the first coil into the deck posts and use the Coil Jig / Screw Driver to center the coil between the posts – I always make sure that the top of the coils is level with the top of the posts as well, just top allow for ample airflow later on. When you are happy with the position, use the Allen wrench to tighten down the screws for this coil. Now use the wire cutter’s to trim off any excess leg that is protruding from the post holes. To insert the second coil, repeat the steps taken for the first. Try to get the coils as even as possible as far as height and general position in the deck, it should be as though they are mirrored opposites.


Step 4.
After tightening everything down, check the resistance readings. If you are reading as you believe you should, we can proceed. If you getting something way off, you may have a piece of wire in between the posts or a screw may be loose. Double check your connections and make sure you have no shorts. Next we are going to align the coils so they fire evenly, which we will do by pinching and pulsing the coils. This may take a few minutes of repeatedly pulsing the coils and adjusting them with tweezers but this is an essential part. Making sure that your coils fire evenly from the center to the outside with no hot spots will ensure you don’t any areas of the coils that burn your wick.


Step 5.
When your coils glow evenly and perfectly, put the RDA to one side for a few minutes and prepare the wicks. I find that for this kind of build, I can take a sheet of 2×2 inch Japanese cotton, that I have pulled apart before cutting down the center. When I have my sheet, I wrap it loosely over itself until I have a perfect tube. After this, I wrap it slightly tighter until it reaches the diameter that will fit into the coils. When the first wick is prepared, do the same with the second one. By the time you have rolled both wicks, the coils are probably cool enough to start working on. Twist one end of the wick tight and insert it through one of the coil’s. If you have the tension right on the cotton, it should slide in with ease, but as it starts to expand it will become tighter with in the coil. You want it so the wick will still move slightly, but not so much it will fall back out. This is a fine balancing act that you will get right over time, too tight it will cut off juice flow to the coils, too loose and most of the juice wont make it to the coils before they get so hot they burn the cotton that is touching them. After inserting the first wick, repeat the process with the second. When both of the wicks are in place, use the scissors to trim the wicks approximately 1/8th of an inch away from the outside edge of the build deck on either side.


Step 6.
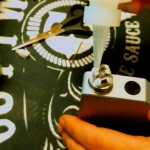
Now that we have 2 wicks in place, the next step is to tuck them correctly into the deck. It may sound simple, but once again, this is part of the art form. We do not want to block the airflow around the coils with too much cotton under them, so we should look at tucking from the sides of the deck. Get as close to the posts as you possibly can and ensure there is a sizable gap in the center. Juice the coils with e-liquid and further adjust your wicks. It is helpful if you pulse the coils slightly to help the e-liquid get into the wicks faster, as this thins out the liquid and seems to pull it into coils almost instantly. When it seems to be completely saturated, pulse the coils until they are almost dry again as this will get rid of the new cotton taste. Fill it back up, you are ready to take your first hit.


Conclusion
As you get used to building on RDA’s things become second nature, you wont need to read “How To” guide’s and will just be able to throw things together in seconds. As far as the Velocity goes, it is one of the simplest, most effortless RDA’s you could possibly wish to build on. Rather than relying on your local shop – or anyone else for that matter – building your coils, sit down, grab some tools and give it a go.
As always, enjoy your vaporizer and vape safe!

